


I hope you enjoy reading this blog post.
If you want to get more traffic, Contact Us


Click Here - Free 30-Minute Strategy Session
Be quick! FREE spots are almost gone for this Month. Free Quote
One of the most valuable tools that individuals with a self-hosted WordPress site can leverage is the Yoast SEO plugin.
This popular WordPress plugin has helped both SEO professionals and personal bloggers to make the site more search engine friendly.

Click Here – Free 30-Minute Strategy Session
Be quick! FREE spots are almost gone for this Month
All the self-hosted WordPress sites can get the Yoast SEO installed, however, the free WordPress bloggers cannot.
Being one of the most all-inclusive WordPress plugin for search engine optimization, it offers an added benefit of zero cost, because it is free!
There is also an option to purchase premium extensions of Yoast SEO for added functionality.
However, the most important functions of this plugin will be a part of the free version.
Some of the major aspects that Yoast SEO helps you to do include:
Today, we are here to present you with simple yest effective steps to get started with this plugin.
Without any further delay let us now begin with the procedure to download and install Yoast SEO.
If you are one of those who do not have this plugin installed on the site, then you are at the right place.
We are here to help you fix this.
However, if you are those who already have this plugin installed and are ready to go but would want to learn more about its usage, then please do not forget to scroll down to our section – “Leveraging Yoast SEO”.
So let’s get started. From the dashboard of your site’s admin, scan the screen along the left-hand side for the option “Plugins”.
Once you find this option, hover over it.
At that time, you will be able to see the option “Add New”.

Now, click on the option “Add New”. You will land on a page with a host of popular, featured, favorite, and recommended plugins.
If you do not find “Yoast SEO” here, then there is a search box provided to find this plugin.
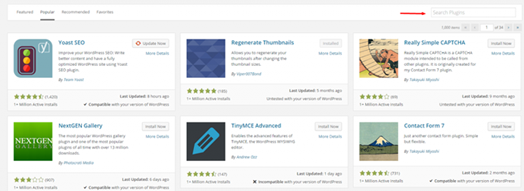
As soon as you locate Yoast SEO, just click on “Install Now”. Once you do this, WordPress will begin to download it, install it and when done, it will update you to activate this plugin.
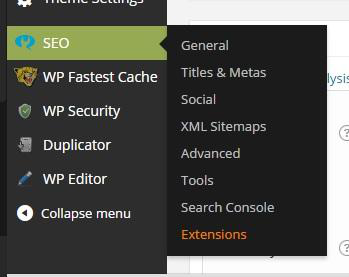
Upon successful installation and activation you will be able to see the option “SEO” on the sidebar menu located on the left-hand side of the admin dashboard.
Although Yoast SEO download and installation are easy, the plugin has to be set up.
If you are using Yoast SEO for the first time, then this might be a little overwhelming.
However, it is certainly not something that you cannot handle.
As ideal Yoast settings vary from one site to another, there are no hard and fast rules to choose the settings.
We have made an attempt to give you an idea about each of the settings.
Before we get into the details of importing the settings from various other SEO plugins, we have got a quick question for you.
Are you already using any SEO plugin? If your answer is ‘Yes’, then you can actually save some time by just importing the settings from the plugin(s) that you are already using.
This can be done by clicking on the “SEO Option” provided on the left-hand-side menu.
Under the this, click on the option “Tools”, then choose “Import and Export” option available.
Finally, you will have to select the tab “Import from other SEO Plugins”.
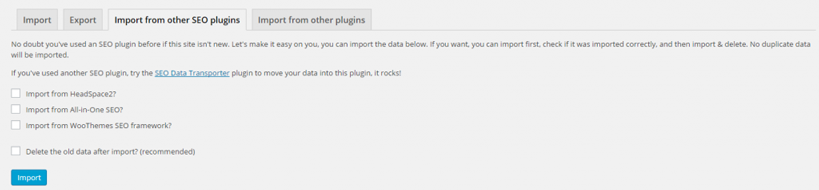
The settings can be imported from “WooThemes SEO Framework”, “HeadSpace2”, and “All-in-One SEO”.
All that you are required to do is to identify the right box and click on “Import”.
However, if you already have old Yoast plugins such as “Yoast Breadcrumbs”, “Robots Meta”, and “RSS Footer”, then you can easily import the settings from these plugins by choosing the tab “Import from other Plugins”.
If you are one of those who are not leveraging any of these plugins, then do not worry. Just explore the plugin “SEO Data Transporter” recommended by the Yoast.
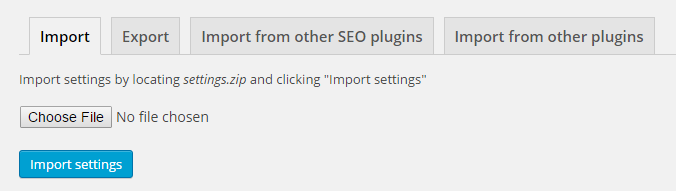
Now, the best way to quickly and efficiently import all the exported settings from the other plugins is to choose the tab “Import”, select the files, and click on “Import Setting”. Kindly refer the image provided above.
Let us begin from the square one if you have not got any settings to be imported. However, if you have already successfully imported the plugins from other plugins, it is better to check all the imported settings to ensure all are correct.
Now, let us get started.
To begin with, go to the “Admin Dashboard” of your site. From the option “SEO” provided on the left-hand-side menu hit “General” Upon doing this, you will land on the page where you can set up the basic SEO options for the site, which are globally applicable.
Now, to give you a clearer picture, we have provided an introductory tour on each of the tabs – “General”, Your Info”, “Webmaster Tools”, and “Security”. We will begin from the now examine each of these in detail:
This is the tab you can turn to if you plan to revert the Yoast SEO to the default settings for some unforeseen reasons.

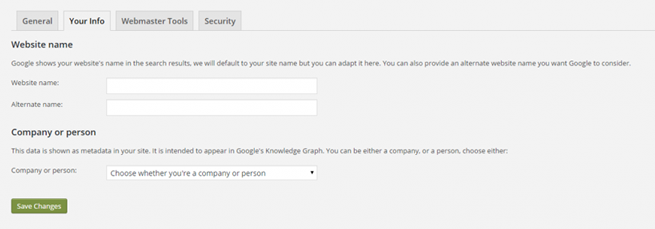
In this step, you can update Yoast about the new or alternative name of your site or just update the existing name of your site, which you would like to use.
Here, you can also specify whether you are an individual or an organization, making it easier for the Google to add your side to the Knowledge Graph results.
If you are a company trying to set up Yoast SEO for your website, then you will have an option to add elements such as your company logo.
This will also be incorporated into the Knowledge Graph results by the Google.
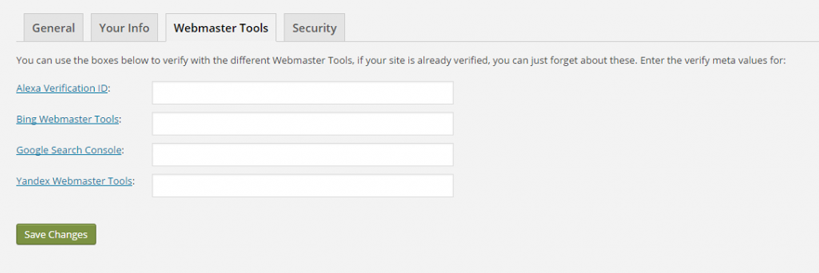
This tab is mainly used to check whether the tools t\you plan to use such as “Bing Webmaster Tools”, “Alexa”, “Yandex Webmaster Tools”, and/or “Google Search Console” are verified or not. Irrespective of which tools you are leveraging, the process to do this similar.
However, here we have explained “Google Search Console”.
The process can be divided into the following simple steps:
Step 1: Here, you will have to first add your site to the “Search Console”.
Then open the dashboard “Search Console” and hit “Manage Property”.
Next, from the box that is adjacent to the site where Yoast is being added to, select “Verify this Site” option.
(You can also check out a comprehensive guide on Google Search Console basics if you require further assistance)
Step 2: Now choose the verification option “HTML Tag”, You will land on the <Head> section.
Copy the code and add it to “Google Console Box”.
However, here you have to delete everything apart from the content in the quotation mark and also get rid of the quotation marks
Step 3: Now, choose “Save Changes” option and go to “Google Search Console” again and click on “Verify”
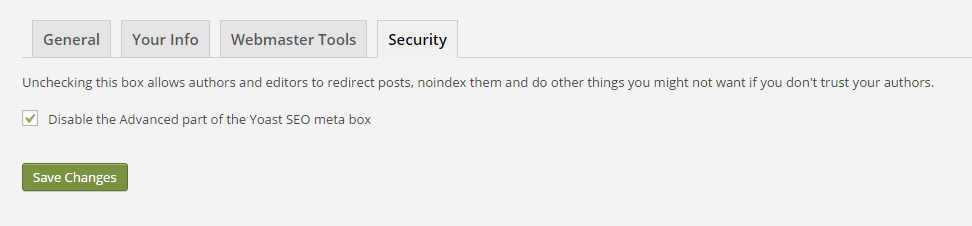
Last but not the least is the tab “Security”.
This box is of use only if your site is accessed by multiple contributors and authors to update the content.
On the contrary, if you have a single author contributing your site then you can forgo this box.
This is because when this particular box is unchecked, by default it enables advanced options such as noindex settings and redirects to become visible in the toolbox of the Yoast, which appears on the page editor of every page.
This can be problematic when multiple users are contributing to your site.
Although it is better to allow all your contributors to upload their content independently, you would definitely not want them to change these types of settings.
So, the best option in such instances is to check this particular box.
Now, let us move on to the section on modifying “Titles & Metas”.
The section can be found below the option “SEO”, which is provided below the left-hand menu.
The section is particularly important for the SEO, as it decides how your site appears on the SERPs.
Once you click on this, you will be able to see the following window:
Below, we have explained each and every tab in this window for you.
Let us now begin understanding the functionality of each of these in detail.
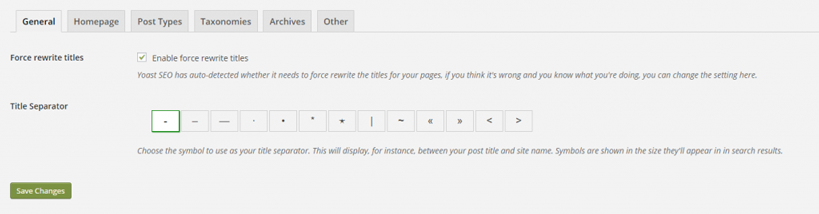
This can be used to change the way in which your titles get displayed. Something like – instead of “Name of your Site I Contact Us Info” you could opt for “Name of your Site – Contact Us Info”.
In this way you will be able to choose the “title separator” of your choice.
This also helps in rectifying problems where the name of the site appears twice.
Sites with WordPress themes will have in-built displays for SEO titles often override your Yoast settings.
Checking this particular box can help you to overcome this problem.
However, if this does not help then try contacting the web developer as this issue can be fixed by editing the code of your site.

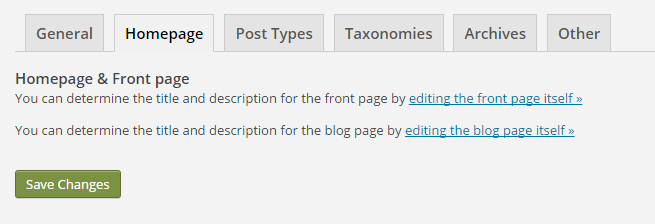
The appearance of this tab hugely depends on the setup of your site.
The site we are referring uses a single page for the blog and a different page for the homepage.
In such case, changes to meta descriptions and titles can be done by hitting on the links “blog itself/editing front page”
This is the place to create basic templates for your metas and titles for all the important pages on your site.
Please remember that the format for the blog page will be totally different from the format applicable for the other pages.
So, it is important for you to write specific search engine optimized metas and titles here.
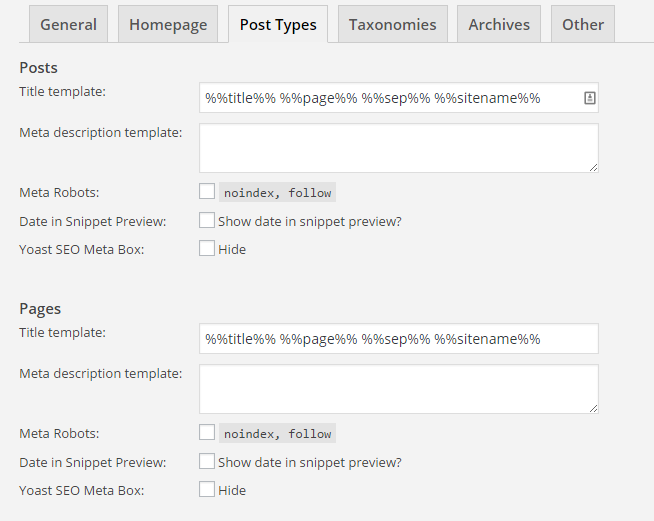
This section can be further divided into sub sections. We have explained each of these below.
This can be used for setting up meta descriptions and titles for blogs with pages on several different categories.
However, it is important to check the noindex or the follow option to escape from the penalties on duplicate content.
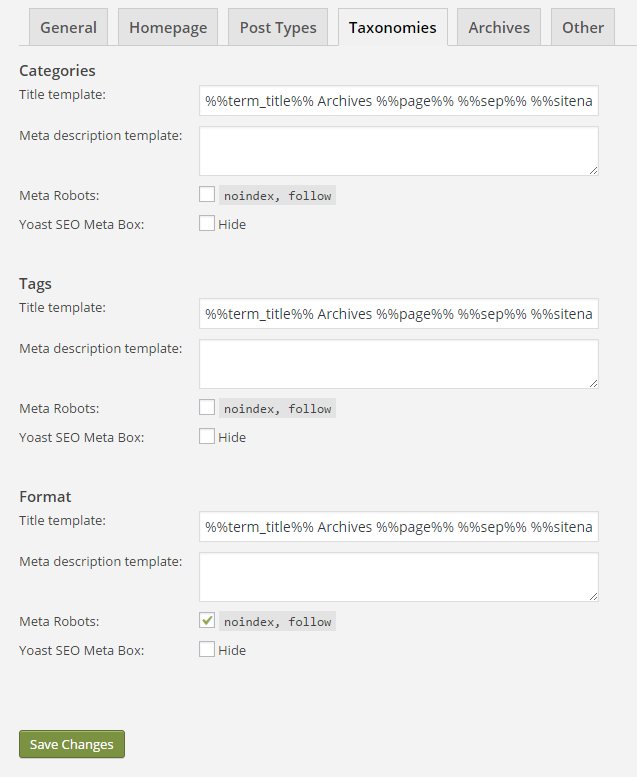
This is for those who maintain blogs with archived content arranged by the author or date to quickly find old content making it easier for the readers.
Archive pages are often considered by the search engines as duplicates and this tab helps in preventing by giving you an option to disable the archive pages.
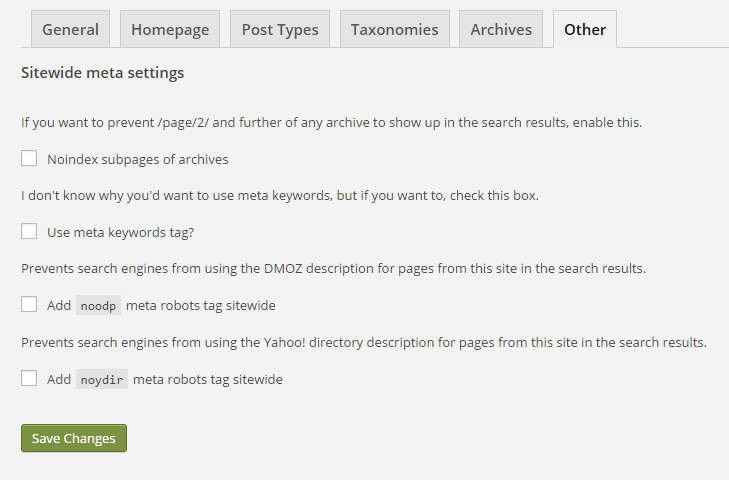
This is the last part of this section and offers a couple of more settings.
This is a straightforward section which enables you to make added changes that help you further.
At this point, we would like to congratulate you for making to this stage.
The settings were the highly time consuming part of this process.
Although there are many other aspects to be taken care of, the aspects that follow will be pretty simple.
This is a simple section and each of the tabs under this are explained below in detail.
The section is found under the option “SEO”, on the left-hand-side toolbar.
By looking at this you can get an idea on how the shared content appears on each platform.
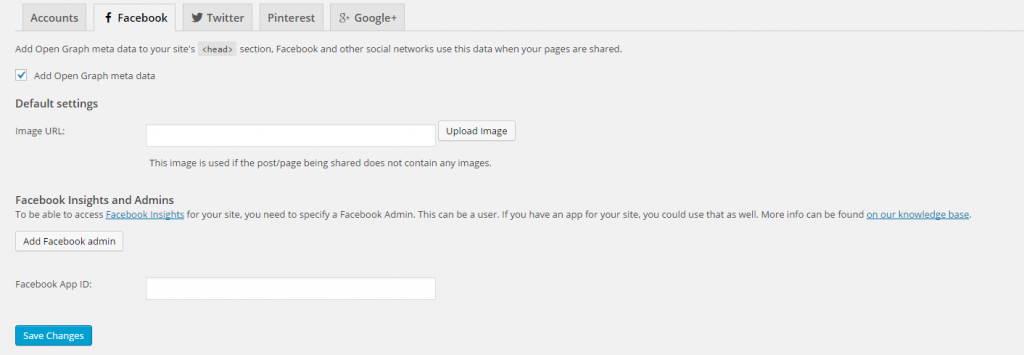
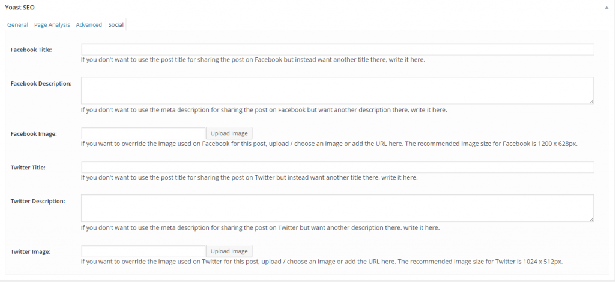
This is a self-explanatory tab. Here, you just have to add the tags to all the social media profiles.
However, for the Twitter section just the user name should be entered but not the profile’s URL.
Filling this notifies the search engines about the association with your site.
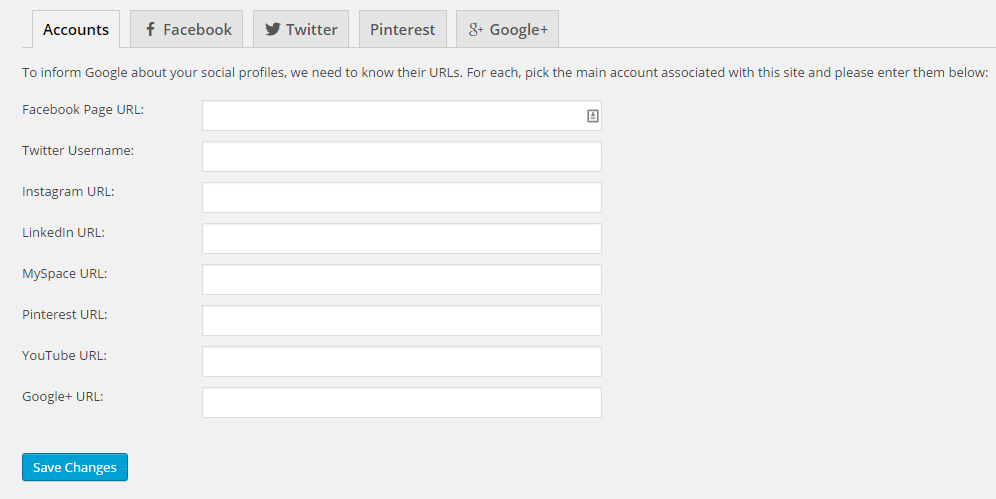
It is important to use appropriate image, description, and title for the pages.
Facebook Insights will help you to evaluate the how frequently your sites contents were liked, shared, and how much traffic is being generated from Facebook alone.
Similarly, “Google+” and “Pinterest” tabs also have identical settings and are designed for the same purpose. Under Twitter tab, you have to create twitter card meta data, the Twitter equivalent to the Facebook open graph.
If you have a Pinterest account then, check the option “Add Open Graph Meta Data” under your Facebook tab and later add Pinterest’s verification code under the Pinterest tab.
Yoast SEO makes it incredibly easy to manage the XML site maps.
When this functionality is enabled, site map is generated automatically and will be updates as soon as you upload fresh content and also notifies the search engines.
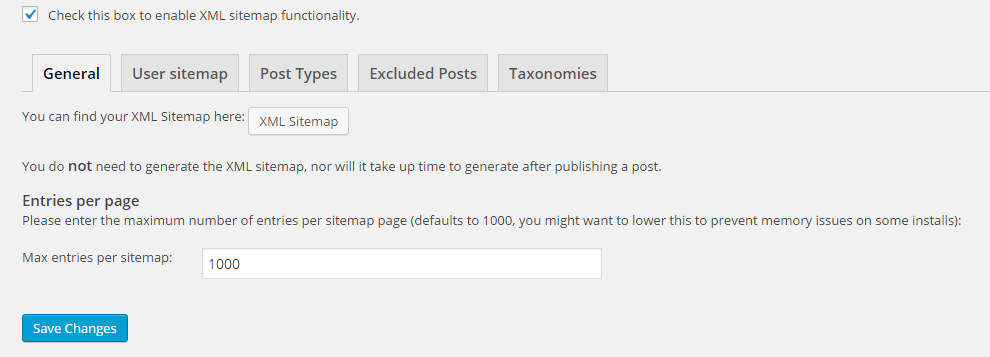
Take a look at the tabs and if you feel that you do not require a specific thing in your site map just check that box.
Certain posts can also be excluded from the site maps by updating post IDs under the tab “Excluded Posts”.
This is one section where the name is misleading.
The section is extremely simple and is on the SEO section on the left hand side.
Advanced section has three tabs which are explained below.

Enabling Breadcrumbs will enable visitors to see the links at the page top revealing the path back to the current page.
Breadcrumbs also reflect in the SERPs.

To know more about using Breadcrumbs on the site, kindly refer an article on implementing the breadcrumbs.
However, if you are unable to edit the theme of your site, then turn to web developer for some assistance.
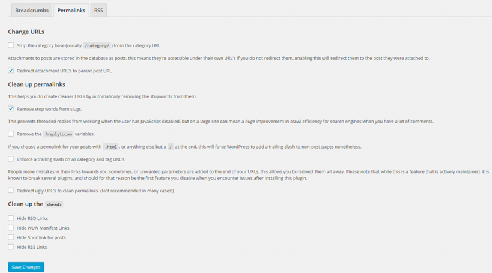
This is for cleaning up permalinks, the URL structure, as well as the <Head> to make it more SEO friendly.
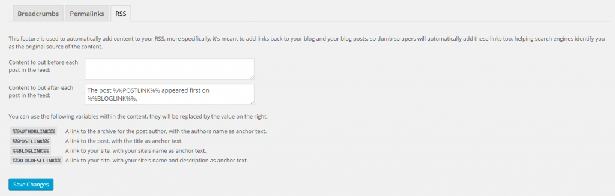
Isn’t it annoying to find a scrapper steals your content word-to-word and publishes it elsewhere without your consent. Using RSS section to add content to your posts will help you to prevent this, because doing this gives your the credit and links back to your website.
This is one of the major settings that has to be taken care of. However, it applies only to the ones that leverage Google Search Console.
On the left hand menu, on from the SEO option hit ‘Search Console”.
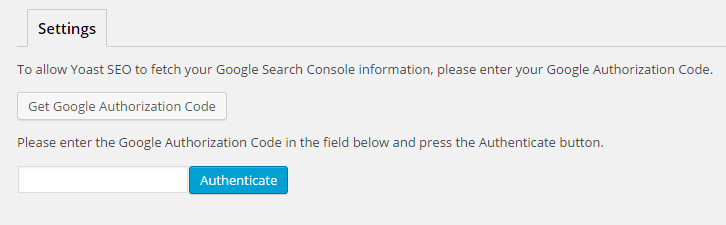
Doing this generates verification code that links Google Search Console to Yoast.
This helps you to view multiple site errors, which are encountered by the visitors of your site.
These errors can be rectified from the dashboard of the site. In addition, redirects can also be set for broken links.
Doing this involves the following 4-step process:
If you have reached here, then it means that you have taken care of all the important settings.
There are 3 major tools here – bulk editor, file editor, as well as import and export. The functions of each are discussed below.

This is used to make changes to multiple descriptions and titles at a time, this will bring up the list of numerous pages and posts.
Here, you can easily go through all the copies and spontaneously make the changes where necessary at one go. So, you can forgo the trouble of visiting each and every page to administer changes.
File Editor
This helps to modify .txt files as well as .htaccess files.
Once you get all the settings right, you can export the settings to get a backup copy.
Import and Export enables you to do just this. Besides, if you are planning to install Yoast SEO on other sites, then this option can be used to export the settings and import it to other sites.
After successful installation and set up of Yoast SEO, head to the admin dashboard of your site towards the left hand side.
Choose the option “All Pages” or “All Posts” to get the list of your posts or pages with a column named SEO on the RHS of the screen, as seen in the image below.

The dots represents how Yoast SEO rates the SEO friendliness of the page using a simple system.
This column is extremely helpful to go through every web page and optimize each one of it. Besides, the posts are also sorted based on the information in that column, making it easier to spot the pages that need improvement.
Just choose the page to open the page editor. Locate Yoast SEO Toolbox below the area where the page content is entered.
This toolbox has multiple tabs, which are explained below
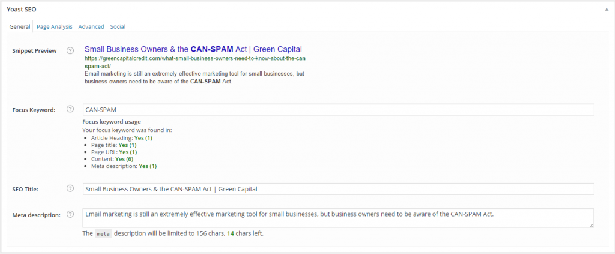
This is the place to write the meta description and title of a page and also specify the keywords being targeted.
Once the focus is set on the keywords, the plugin evaluates the heading, URL, meta description, title, and content of the page and highlight the number of times the keywords are used.
Such a setup helps to identify whether there is any instances of keyword stuffing.
However, while setting the keywords it is important to choose the primary keywords. As you will only be able to focus on a single keyword at a time, it explains why you should select the primary keyword.
Next is the “Snippet Review”, which is an awesome tool. The tool helps you to view your metas and titles, ensuring that nothing gets cut off in the SERP.
After setting the focus keyword, save a draft and hit “Page Analysis” to get specific feedback on how search engine friendly the page is.
Yoast provides feedback by evaluating factors such as the right frequency of using targeted keywords, outbound links, images, length of the content, etc.
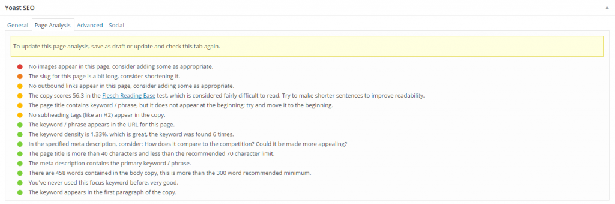
Your obvious aim would be to get maximum green dots and to quickly fix the red dots. Although Yoast gives exhaustive feedback, it is not necessary for you to consider all that.
For instance, in the screenshot above, there is a red dot for a missing image. However, that piece of content has an image, which is not inserted into the body of the content, which was not picked up the Yoast.
As the Yoast takes a highly objective look at the content, it is essential that you do not implement and illogical changes.
Another instance is the one in which you might be suggested by the Yoast to rewrite the title to add the primary keyword in the beginning of your title. Please do this only if there is a way to make it look natural. If not, just ignore the suggestion.
If you have not yet disabled the Advanced option in your meta box, then this tab will be visible to you.
This can be used for modifying the site maps and robots settings as well as set up redirect URLs such as 301 redirects. In case of content that is published elsewhere, canonical URLs can be established here.
Following is a quick rundown through the sections of the “Meta Robots Advanced” tool:
At this point, your page looks impressive to the search engines. So, now let us head towards the Social to make your page looks interesting and engaging to the social media too.
As social media feeds are fast paced, it is essential to make the pages look eye-catchy to cut through the competition and look appealing to the audience making them feel that it is worth sharing.
If nothing is filled here, then the social media sites will choose the metas and titles of your posts by default. Unfortunately, it is not necessary that social media chooses the most informative or captivating part of your content.
So, it is necessary for you to ensure that incredible content and info are entered in this space.
You can also upload enticing images and attention-grabbing content that works well across the social media.
Once you are done with the page optimization, it is time for you to focus on scheduling your post.
You can plan this with the “Publish” option. Here you can adjust the privacy settings and/or just go ahead and click on the “Post”.
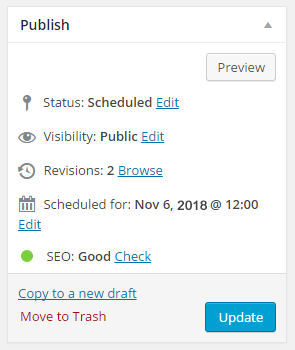
There is also an additional option that explains how the Yoast SEO has provided and overall rating for a specific page.
A green dot signifies that your page is good to go.
The functionality offered by this free plugin is actually incredible.
At this point with knowledge about the capabilities of this plugin, you will now be able to make your site more SEO friendly.
If you are looking out for some extra functionality, then the best option would be to consider evaluating the extensions of premium Yoast SEO.
There are 4 different extensions in the premium Yoast SEO – Yoast SEO Premium, Video SEO, News SEO, as well as Local SEO.
We have discussed each of these in detail below.
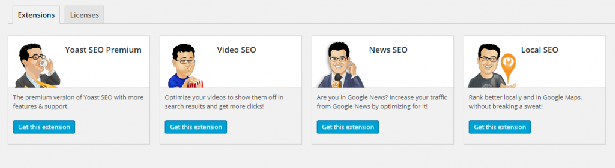
The extension is particularly useful for those who often redirect numerous URLs, as it is an efficient redirect manager that helps you to quickly import any type of redirects.
Yoast SEO Premium imports redirects from .htaccess file, writes redirects to .htaccess file, and also opts the type of redirect you prefer.
It also offers more tools that make creating redirects easier.
In addition, you will be receiving access to video tutorials to empower you with further clarification to successfully leverage Yoast SEO.
This plugin is exclusively targeted for the sites that have more video content.
Video SEO plugin will help you to feed search engines with the right information that help in indexing your video content. Doing this yields richer SERP snippet results.
Rich snippet results are extremely difficult to achieve.
Although using Video SEO plugin does not assure this, if your content is considered to be worthy by the Google, then this plugin will help you to get a rich snippet result.
Does your site focus on the news content? Well, then News SEO plugin is just for you.
The plugin will help you to optimize your site appropriately to get you page featured in the news results page of the Google.
News SEO will not just submit your page directly to Google, but it optimizes your site such that the Google News will recognize and uphold your page.
You will also get option to create XML news site maps, Standout Tag, etc.
Finally, we have arrived at the last plugin – Local SEO.
If you want your site to be strategically featured across specific geographic search results, then this extension is the answer you are looking for.
All the necessary information of your business, such as postal address, contact number, and operational hours will be provided to the search engines by the Local SEO.
This enables search engines to provide detailed and accurate information about your site to searchers.
We have made a humble effort to provide you with a comprehensive manual to download, install, and leverage Yoast SEO.
However, if you have any queries or if you feel any concern has not been addressed, then make sure to leave your thoughts and questions in the comments below.
After all, we look forward to hear from you!
Be quick! FREE spots are almost gone for this Month


LEAVE A REPLY